 /* Code Comments */
debugging a node cli written in typescript with vs code
2020-10-06
|~5 min read
|915 words
I’ve been writing recently about setting up projects with Typescript as well as Babel and ESLint. Those explorations, however, we all in service of being able to debug a Typescript project in VS Code. More specifically, however, I wanted to be able to step through a CLI with interactive prompts.
Let’s take this one step at a time. If you’ve followed the previous posts, then you already have a set up of Typescript with Babel and ESLint. Now, let’s configure our VS Code to be able to debug a Typescript project. Furthermore, I’m making a few slight modifications to my previous attempt to debug Typescript files.
The steps we’ll take are:
All of the code can be found on GitHub in my typescript-cli-prototype repo
Add Debug Script
The first thing we’ll do is add a few scripts to our package.json (this part doesn’t actually require or use Babel/ESLint):
{
  "scripts": {
    "tsc": "tsc ",
    "build": "tsc && node ./dist/index.js",
    "debug": "tsc --sourcemap",
    "start": "node index.js"
  }
}
The debug script is what is going to be particularly relevant for us.
Emit SourceMap
Next, we want to go to update our tsconfig.json to make sure that when we transpile our Typescript files, we emit source maps. This will emit a .map file that will assist with debugging.
 {
   "compilerOptions": {
     //...
+      "sourceMap": true /* Generates corresponding '.map' file. */,

   }
 }
Create Debugger
Visual Studio Code’s debuggers are managed by launch.json files that live in a hidden directory in your project, .vscode.
To create a new one, you can either manually create it, or via the Debugger side nav menu, you can “create a launch.json file”.
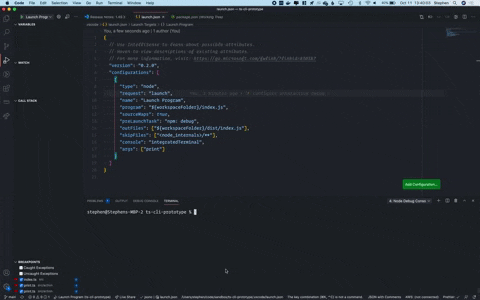
Using the default launch.json for a Node environment, we need to make only two small tweaks to be able to debug the Typescript application:
 {
   // Use IntelliSense to learn about possible attributes.
   // Hover to view descriptions of existing attributes.
   // For more information, visit: https://go.microsoft.com/fwlink/?linkid=830387
   "version": "0.2.0",
   "configurations": [
     {
       "type": "node",
       "request": "launch",
       "name": "Launch Program",
       "program": "${workspaceFolder}/index.js",
+        "sourceMaps": true,
+        "preLaunchTask": "npm: debug",
       "outFiles": ["${workspaceFolder}/dist/index.js"],
       "skipFiles": ["<node_internals>/**"]
     }
   ]
 }
The sourceMaps setting will plug in and allow for better debugging. Further, before the debugger launches, we’re taking advantage of VS Code’s ability to run tasks using the preLaunchTask configuration. In this case, we’re telling it to run the debug script defined in our package.json (note: even if you use yarn to manage your packages, VS Code expects npm here).
At this point we’re effectively at the same place I arrived at previously (through a different route) to debug Typescript applications. So, let’s now go one step further and handle debugging interactive applications.
Modify Debugger For Interactivity
While the preLaunchTask is helpful to start a Typescript project, it doesn’t address interactivity. By interactivity, I mean applications that require user input which will affect how an application behaves. In a web application, this is where a break point exists on a button and you want to inspect the state of the application when a user clicks on a button. Because we’re dealing with a CLI, however, we want to pause and inspect what is happening when a user engages with a prompt.
To do this, we’ll want to use two features of VS Code’s debugger:
- The ability to pass arguments ot the command line
- Access to a terminal that is attached to the process
Passing Arguments
In our example application, we have one command for the program, print. To invoke it, we need an argument of print passed along on start of the application.
To mock this functionality, we can specify it with an "args" key in the launch.json. Arguments are passed as individual string elements, so, if you had a flag that took a value, these would be subsequent elements in the array.
As an example, imagine the user could specify the text to print from the command line, like so (the name of the application is democli):
democli print --text "Hello, world!"Then, in the launch.json, this would be:
{
  "version": "0.2.0",
  "configurations": [
    {
      "args": ["print", "--text", "\"Hello, world\""]
    }
  ]
}
Attaching A Terminal
By default, the Node debugger in VS Code uses the internalConsole. This is a great solution except that it does not allow inputs - which is a key requirement for our use case here.
There are two other consoles available that can be configured with the console key in the launch.json configurations array: integratedTerminal, which is the same terminal you can access via ⌃ + ~, and externalTerminal
If an external terminal is used, you can configure which terminal program to use via the
terminal.external.windowsExec,terminal.external.osxExec, andterminal.external.linuxExecsettings.
We’ll stick with the integratedTerminal:
{
  "version": "0.2.0",
  "configurations": [
    {
      "console": "integratedTerminal"
    }
  ]
}
Conclusion
Over the course of a few posts, we’ve explored how to configure a Typescript application from scratch, integrate ESLint and Babel, and finally, in this post how to debug an Typescript application, including when it’s an CLI app that requires the ability to pass arguments and interact with the application via a terminal.
Again, if you’d like to play with it yourself, you can see the prototype I used here.
Related Posts
Hi there and thanks for reading! My name's Stephen. I live in Chicago with my wife, Kate, and dog, Finn. Want more? See about and get in touch!