 /* Code Comments */
oh-my-zsh and persistent aliases
2018-12-22
|~4 min read
|631 words
NB: If you want the quick steps to add aliases to your zsh, jump down to the section, ”Adding Aliases: The Better Way“.
First, a little backstory: I’m a big fan of aliases. In fact, when I was learning how to use terminal, they were one of the first things I set up for myself and they changed the way I used git. Every command was so much easier to navigate that I never felt a need to stray away from the command line.
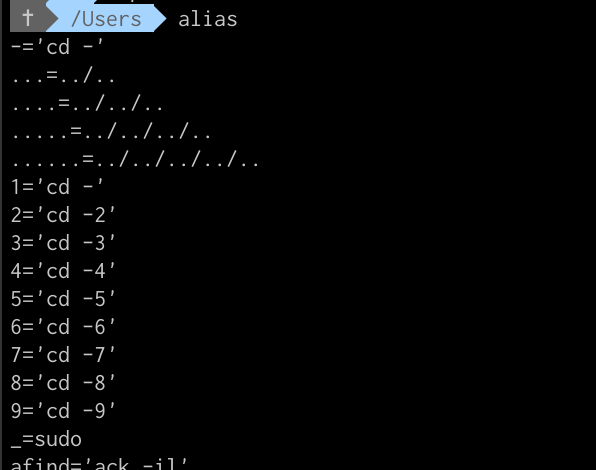
When I decided to move to zsh, one of the first things I wanted to do was configure my aliases. oh-my-zsh comes with a whole suite of aliases, which are viewable through the alias command. There are some great defaults, particularly for navigation and git.
Still, I had a few navigation aliases I wanted to add.
Adding An Alias: The Easy Way
In hunting for how to add an alias, my first Google search suggested using the alias command. This was straightforward and seemed to work well enough for a while.
$ alias up=‘cd ..’
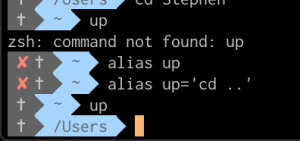
Woot! It worked!
Then, I’d close the close the terminal and come back and I’d get an error: zsh: command not found: up.
What the heck?! Sure enough, when I searched through the aliases (using the alias command) up wasn’t there.
Finding The Problem
When I was adding aliases to bash, I would do so by saving them to the .bash_profile file (I hear you can also use the bashrc file). It made sense to me then that the aliases I was adding would wind up in the ZSH equivalent - so, I opened .zshrc to take a look.
If you’re an oh-my-zsh user, you may see the following in your config file:
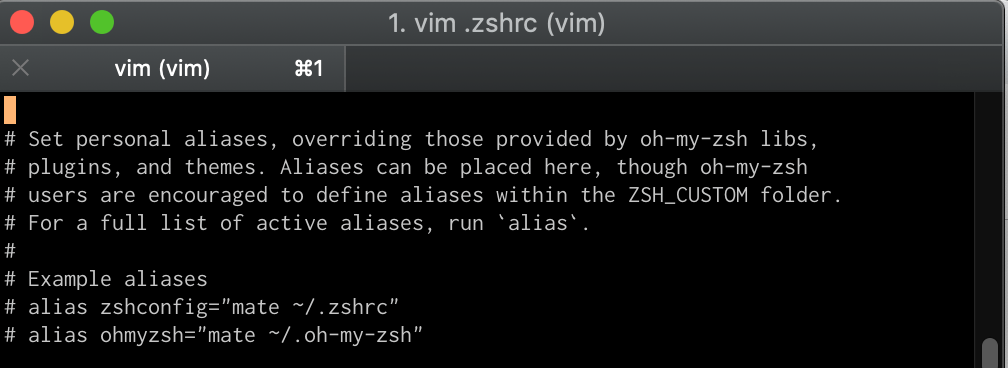
A couple of things struck me about this message:
- My aliases, as well as all of the others I saw when I ran
alias, were not listed there - While it seemed like I could put my aliases there,
oh-my-zshencouraged saving them in theZSH_CUSTOMfolder
To find ZSH_CUSTOM, I used the echo command: echo $ZSH_CUSTOM.

And just like that, I knew where I needed to look around.
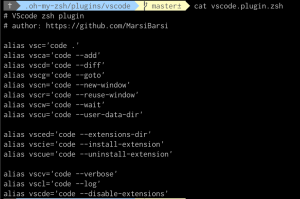
What I found by navigating through the oh-my-zsh directory was that plugins, themes, etc., were all stored in files with extension .zsh.

The ZSH shell then was looking through this file to find all of the aliases that were defined and giving me access to them. Armed with a better understanding of how oh-my-zsh was finding aliases and functions to access from the ZSH shell, I could now (more) comfortably add my own.
Adding An Alias: The Better Way
The steps to adding aliases for oh-my-zsh is as easy as reading the instructions embedded in the docs provided. But, if you’re like me and they weren’t immediately clear, here are the five steps you’ll need:
-
Go to the folder
$ cd ~/.oh-my-zsh/custom -
Create a new
.zshfile. You can name it what ever you’d like, but for testing, I createdaliases.zsh -
Add you new aliases to your new file. You can do this by opening the file with your preferred text editor. Here’s what mine looked like
#An alias to naviage up one directory level alias up='cd ..' -
Save and quit the editor
-
Restart your terminal or use
$ source ~/.zshrc
Voila! Your new custom aliases will now be available!
Time Saving Ideas
Looking for inspiration? Check out this thread for a list of great time-saving aliases in bash/zsh:
Related Posts
Hi there and thanks for reading! My name's Stephen. I live in Chicago with my wife, Kate, and dog, Finn. Want more? See about and get in touch!